
How To Connect Kindle Fire to PC or Laptop Computer
There are so many people who buy or are gifted their Kindle Fire and all they do is read books on it. Your Kindle Fire can be used for so much more. In fact, my mom, who has an iPad, just asked me last night what I was doing as I had my Kindle Fire in my hand. “I am watching a movie,” I said. “Oh,” she replied, “I thought Kindle’s were only for reading books.” Such iPad presumption!
So, we can do a whole lot more than read books on our Kindle Fire but to do some of these things we need to be able to connect the Kindle Fire to our PC. For example, in my case, I have hundreds of movies stored on my PC and would like them available on my Kindle.
Fortunately, this is a very easy how-to. It’s easy to connect the Kindle Fire to your PC. So, let’s get started.
The Kindle Fire Connection: A Micro-USB Cable
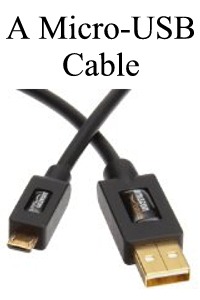

A Micro-USB cable looks like the photo to the left. One end is the regular USB end, like you are accustomed to, and the other-end–the end that will attach to the Kindle Fire–is “micro”, meaning that it is just smaller.
Connecting the Kindle Fire To The PC or Laptop
After you have your Micro-USB cable in hand, we now need to get the PC or laptop connected to Kindle Fire. To do so, find the Micro-end of the USB cable and plug-it into the Kindle. Then, plug the other standard USB side into your PC or laptop.
Your connection should now look like the photo below.


How To View the Contents of Your Kindle on Your PC or Laptop
Ok, great, but now that you have them physically connected, what can you do? Well, it’s just a matter of knowing the right buttons to push.
After you have the connections in place, launch the File Explorer in Windows 10 by pressing Win + E at the same time. (Here are 9 more ways to open File Explorer in Windows 10.)
You should now see your Kindle Fire Drive there. Take a look at the photo below. The first image is my “My Computer” Screen before connecting the Kindle and the second image is after I connected the Kindle. Notice the system now has an F: drive. That’s the Kindle.


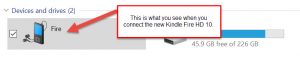
And sometimes, instead of seeing “Removable Disk” you may see the Kindle Fire icon as you see in the photo below after I connected the new Kindle Fire 10 HD (which I absolutely love by the way).

Now, you can copy and paste files back and forth between your laptop or PC computer and your Kindle Fire.
After you copy the files onto your Kindle, you should download the ES File Explorer app from the Amazon store to easily navigate files on your Kindle.
Finally, if you like your Kindle and are wondering whether you should subscribe to Amazon Prime, read my Amazon Prime review to figure out if it’s worth it.