

In this article (updated and tested March 19th, 2019), I am going to tell you how to record audio from your computer so that you can listen to it time and again. This audio can be from any source: Internet radio, TV, movies. As long as it is playing sounds on your computer, you can record it to your computer.
You may want to record audio from your computer for a variety of reasons. For me personally, I wanted to record Spanish language radio and TV so that I can get the sounds down and practice the language. There can be many other reasons to record the audio coming from your computer and I am sure that you have a good reason.
Before going any further, let’s tell you what not to do. You do not want to play the audio from your microphone and then record it. Though this may work for recording, the recorded audio will probably sound terrible!
Now, for those of you with Windows 7 (or Windows in general), you have come to the right spot. I have just been researching this and it is fresh in my mind. And, it’s easy to record your computer’s audio. Well, it will be easy now…I just went through all of the painstaking procedure to figure it out for you.
So, without further ado, let’s get started.
How To Record Sounds/Audio From Your Computer in Windows 7
The 5 step procedure highlighted below will have you recording sounds on your Windows 7 computer in no time.
Step 1: Download this program.
The best program for recording the music or sounds on your computer is called Audacity. Our first step is to do this. So, to begin, download Audacity here. Then, install it.
Step 2: Setup your Windows 7 computer to record sounds
Remember, we are not recording from the microphone; that produces very low quality results. We are recording the native sounds emanating from your computer.
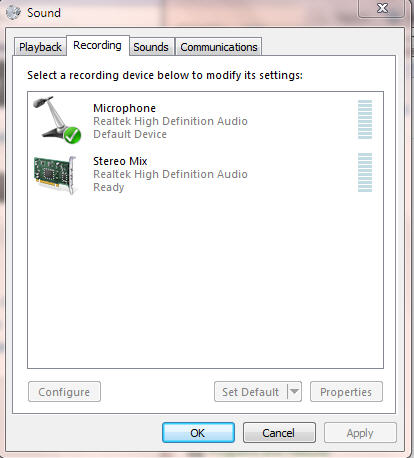
To begin this step, Visit Start > Control Panel > Hardware and Sound > Sound > and then click the “Recording” tab. Right-click in the open window and choose “Show Disabled Devices”. This should add a choice in the “Recording” Window called “Stereo Mix”. You want to make sure that that is enabled and looks like the photo below. This step is unique to those who want to record sound using Windows 7. This step can probably be skipped if you do not have Windows 7.
Step 3: Tell Audacity about this “stereo mix” choice
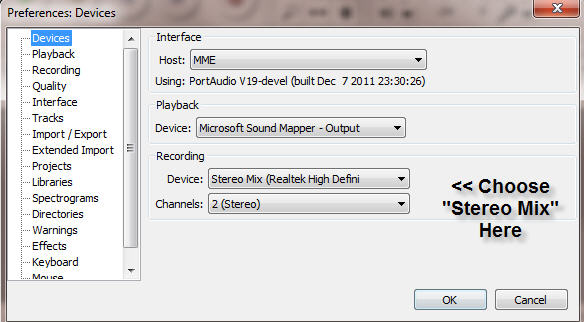
Now, start the Audacity program that you installed in step 1. Then, visit “Edit | Preferences | Devices”. Now, under “Recording” and next to “Device”, you want to choose “Stereo Mix” as you see in the photo below.
Step 4: Begin recording with Audacity
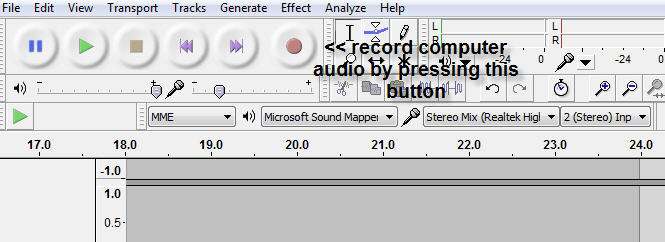
You should now be ready to start recording, which you can do in the main Audacity Window. To do so, simply start the audio that you wish to record in the background and then click the record button as you see in the photo below.
Step 5: Saving (Exporting) the sound file in Audacity
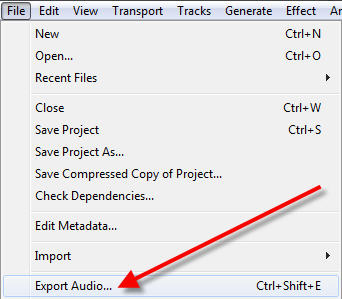
Once you have completed the recording, click the stop button. You now want to save your audio file so that you can hear it whenever you would like. However, rather than click save (as you might assume), you want to choose File | Export Audio as you see in the photo below:
After choosing Export Audio, you will have several “Save as type” choices. Your system may default to the very old but default Windows choice of a “WAV” file. This will work but the file will end up being extremely large.
Your best choice here is to save the file as type “MP3 Files”. This will create files with quality sound that will not be too large. However, you will be prompted for the location of the “lame_enc.dll” file. See Step 5a below to install this.
Step 5a: Installing the lame_enc.dll file for Audacity
When trying to export MP3 files with Audacity, you will need the lame_enc.dll file which is not included with Audacity due to some restrictions. To get this file installed, download and run this program.
This will install the lame_enc.dll in the following directory: C:\Program Files (x86)\Lame For Audacity. Now, when you choose to save as type “MP3 Files” and it asks you to locate the lame_enc.dll file, simply point to that directory and you’re good to go. (NOTE: If you do not find the file in the location above, it may have been placed in the C:\Program Files\Lame For Audacity directory.)
Recording Computer Audio: Conclusion
I hope quick article helped those who are trying to record sounds from their computer on Windows 7. The Audacity program that we use to do this is very complicated as it is used by many audio professionals. However, if you follow the exact instructions above, it becomes easy.
It took me about 2 hours to find out how to do this, but once I mastered the process, I find it very simple and use it all the time to record audio from my computer.
As always, if you have any questions, hit me up in the comments below!
Cheers,
Richard

Get your copy of his latest book entitled Obvious Conclusions, stories of a Midwestern emigrant influenced and corrupted by many years living in San Francisco and abroad. It just received its first outstanding review "...reminiscent of David Sedaris or Augusten Burroughs" on Amazon UK.
- How to use Google Translate [The Ultimate 2021 Guide!] - June 18, 2021
- How To Check Your American Express Gift Card Balance [2021 Updates] - June 18, 2021
- How to Use YouTube TV With a VPN [or abroad] - July 4, 2020