 This page is all about How To Dance Cumbia.
After spending time in South America, I fell in love with Cumbia and Salsa, though my techniques need improvement. On this page, I’ll bring you all the best videos on How To Dance Cumbia.


This page is all about How To Dance Cumbia.
After spending time in South America, I fell in love with Cumbia and Salsa, though my techniques need improvement. On this page, I’ll bring you all the best videos on How To Dance Cumbia.


DVR to Computer

 This page is all about how to be scene. We take a look at how to be a scene girl or boy with scene photos, videos, fashion, and reactions to scene kids. It’s the ultimate scene kidz page!
First, let’s come up with a definition of the term scene kids. We are all familiar with the term scene–the music scene, the party scene, the fashion scene, etc, but there is a specific term for a look and style used today by kids and this term is “scene kid”.
What is this particular look and style?

 This article shows you how to copy a DVD for free. If you want to know how to copy DVD to DVD, this article will show you how to copy a DVD and just how easy it is.
For the tech savy who want the quick solution without the details, here are the 5 steps on how to copy a DVD quickly and for free:
 In this article, “Copy DVD To Hard Drive“, we will answer the question, “Can I Copy A DVD Onto My Hard Drive?”. In fact, you can copy a DVD to your hard drive and it’s not that difficult. It’s even easier than if you want to Copy DVD to DVD!.

 In this article, I will illustrate to you how to make a Favicon for your website.
First, we will look at the simple steps of how to make a favicon for your website followed by a short how-to video so that you can follow along.
Following that, we’ll go into more detail about what a favicon is and how to choose your website Favicon: Should it be your company name, logo, or another graphic?
Now, let’s delve right into how to quickly create the best favicon for your site.
A favicon for your website can be generated in 4 simple steps. I have outlined these steps below and each is articulated in the short how-to video below.
In this video, I will illustrate how to make a Favicon for your website in 4 simple steps.
Simply put, a Favicon (also called a website icon, among many other nicknames) is that little icon that you see up in the browser bar next to your website name. Here is a picture of the favicon on this site right now:

If you do not implement a favicon, your website will use the default Favicon which looks something like this:

A favicon is not required on your website, but it is good to have because it makes your website standout from sites that do not have favicons.
People take subtle notice of it in the browser bar, but, more importantly, people see this icon in their bookmarks which makes your site stand out more.
Take a look at the photo below to see how favicons make your site standout among other bookmarks and favorites.
![]()
Thus, while a favicon will not bring your website massive amounts of traffic, it will benefit you with small amounts of return traffic over the long haul. Plus, it simply makes your site stand out just a little bit more when people visit it.
Creating a favicon for you website is actually not that difficult as you saw in the steps and video above.
The difficult part is determining what you want your favicon to be.
Should your favicon be your company name, your company logo, or some derivative of one or the other?
Though this may seem like it is an easy choice, it is not due to the size limitations of the favicon.
If you have a long company name, such as we do (https://thisishowyoudoit.com), you can not use the whole name because it will not fit. The size of that little icon is very small.
Let’s take a look at the favicons of two prominent tech companies: Intel and Microsoft.
Whose whole company name do you think would fit in the icon? You probably guessed right. Take a look at their respective favicons below:
Intel Favicon:

Microsoft Favicon:

As you can see, the Intel logo works nicely as a favicon for Intel because the name is not too long. In Microsoft’s case, they simply chose the letter M as a favicon because their name and logo are too large to make it into a favicon.
In this case of ThisIsHowYouDoIt.com, our name is far too long to be a favicon. However, just using the first letter of “T” did not really represent what we are about. We narrowed it down to two choices “DoIt” or “How”. We ended up choosing “How” simply because it was very simple and also the word “DoIt” (which is great because it represents what we are all about) does not come across very well in a small icon.
You can see the term “how” in our favicon above in your browser tab. The larger version looks like this:

Once you have decided what you want your favicon to be — and sometimes the only way to know this is through experimentation — you are now ready to use the instructions above to create your favicon.
On this page, we have brought you detailed textual and video instructions on how to make a favicon.
Favicons distinguish your site by adding an icon next to your website name and they give your site a more professional look and feel.
If you do not have a favicon, it’s time you put one on your site. It doesn’t take that long and its well worth the effort.
So get out there and make a favicon for your website!
PS: Those who enjoyed this page also found the page How To Resize Pictures page very useful.

 In the new age of LCD TVs, many of you want to know How To Connect Computer To TV. When you connect your computer to your LCD TV, you open up a world of possibilities.
Many people like to connect computer to TV for entertainment purposes. If you are having a party, and you would like to show people pictures or videos that you have taken, this is a terrific way to show everybody in the room.

In this article (updated and tested March 19th, 2019), I am going to tell you how to record audio from your computer so that you can listen to it time and again. This audio can be from any source: Internet radio, TV, movies. As long as it is playing sounds on your computer, you can record it to your computer.
You may want to record audio from your computer for a variety of reasons. For me personally, I wanted to record Spanish language radio and TV so that I can get the sounds down and practice the language. There can be many other reasons to record the audio coming from your computer and I am sure that you have a good reason.
Before going any further, let’s tell you what not to do. You do not want to play the audio from your microphone and then record it. Though this may work for recording, the recorded audio will probably sound terrible!
Now, for those of you with Windows 7 (or Windows in general), you have come to the right spot. I have just been researching this and it is fresh in my mind. And, it’s easy to record your computer’s audio. Well, it will be easy now…I just went through all of the painstaking procedure to figure it out for you.
So, without further ado, let’s get started.
The 5 step procedure highlighted below will have you recording sounds on your Windows 7 computer in no time.
The best program for recording the music or sounds on your computer is called Audacity. Our first step is to do this. So, to begin, download Audacity here. Then, install it.
Remember, we are not recording from the microphone; that produces very low quality results. We are recording the native sounds emanating from your computer.
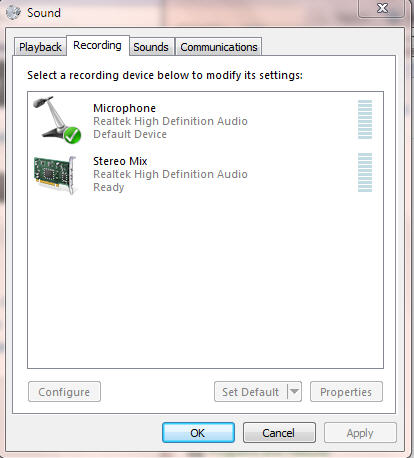
To begin this step, Visit Start > Control Panel > Hardware and Sound > Sound > and then click the “Recording” tab. Right-click in the open window and choose “Show Disabled Devices”. This should add a choice in the “Recording” Window called “Stereo Mix”. You want to make sure that that is enabled and looks like the photo below. This step is unique to those who want to record sound using Windows 7. This step can probably be skipped if you do not have Windows 7.
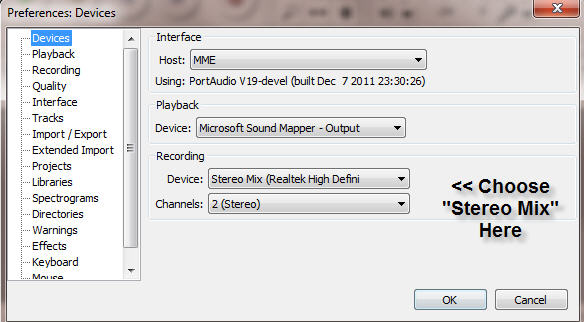
Now, start the Audacity program that you installed in step 1. Then, visit “Edit | Preferences | Devices”. Now, under “Recording” and next to “Device”, you want to choose “Stereo Mix” as you see in the photo below.
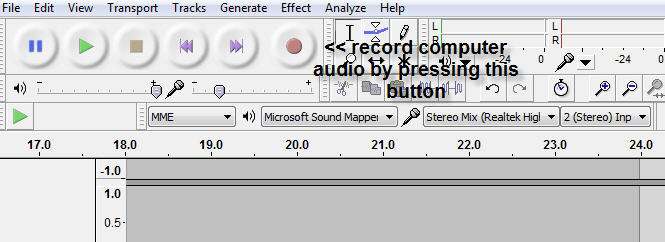
You should now be ready to start recording, which you can do in the main Audacity Window. To do so, simply start the audio that you wish to record in the background and then click the record button as you see in the photo below.
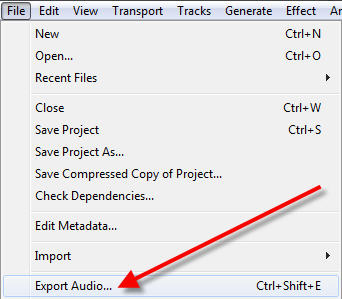
Once you have completed the recording, click the stop button. You now want to save your audio file so that you can hear it whenever you would like. However, rather than click save (as you might assume), you want to choose File | Export Audio as you see in the photo below:
After choosing Export Audio, you will have several “Save as type” choices. Your system may default to the very old but default Windows choice of a “WAV” file. This will work but the file will end up being extremely large.
Your best choice here is to save the file as type “MP3 Files”. This will create files with quality sound that will not be too large. However, you will be prompted for the location of the “lame_enc.dll” file. See Step 5a below to install this.
When trying to export MP3 files with Audacity, you will need the lame_enc.dll file which is not included with Audacity due to some restrictions. To get this file installed, download and run this program.
This will install the lame_enc.dll in the following directory: C:\Program Files (x86)\Lame For Audacity. Now, when you choose to save as type “MP3 Files” and it asks you to locate the lame_enc.dll file, simply point to that directory and you’re good to go. (NOTE: If you do not find the file in the location above, it may have been placed in the C:\Program Files\Lame For Audacity directory.)
I hope quick article helped those who are trying to record sounds from their computer on Windows 7. The Audacity program that we use to do this is very complicated as it is used by many audio professionals. However, if you follow the exact instructions above, it becomes easy.
It took me about 2 hours to find out how to do this, but once I mastered the process, I find it very simple and use it all the time to record audio from my computer.
As always, if you have any questions, hit me up in the comments below!
Cheers,
Richard

 After purchasing an iPod, many people then ask, “How Do I Download Songs Onto iTunes?” because they have existing music and want to know how to get it into iTunes and then onto their iPod.
When people are first told that they need to use iTunes with their iPod, the first question people want answered is How Can I Get Free Itunes For My Ipod? Well, you are in luck because iTunes is a free program that you can simply download and install. To do this, click here to install the latest version of iTunes.

 Hello, and welcome to our baseball homepage.
Here you will find all the great how to play baseball videos on the Internet.
At its essence, baseball is comprised of three components: how to hit the baseball, how to throw the baseball, and how to catch the baseball.
Additionally, baseball is a game of many rules. If you ever sat down with a foreigner who’s never seen baseball, you’ll remember just how many rules that there are.